Though not the most time consuming part of my Imperial Agent project, creating the tunic was far and away the most frustrating. Sewing is something you simply have to practice a lot to do well; my usual trick of watching a couple of experts on YouTube only got me so far. Worse still was that without a pattern you’re pretty much boned, and imperial officer tunic patterns are pretty thin on the ground.
Finding the Pattern
I decided to start with a ANH imperial tunic modify it from there. It turns out there aren’t any patterns for that out there, and googling revealed that most makers use a civil war pattern, McCall’s M4745 and then modify that. So now having no clue how to modify a pattern, I need to modify a civil war outfit to look like an ANH era Imperial Officers uniform so I can modify it further to get to a SWTOR era uniform.
I headed to ebay and bought my pattern. When it turns up I cut out the pieces I think I need, opting for a mashup of A type and B type outlines to try and get to my Imperial Uniform. I decided to discard the trousers as I figure they are easier to buy and don’t need to match.
Making a Muslin
So, more googling and everyone recommends making a “muslin” of the outfit first. This I naively take somewhat literally and headed to ebay and bought some muslin. Frustration ensued as the cheap, thin and roughly woven muslin is very hard to work with. It won’t hold it’s shape or even stay still for a noob like me to cut it out properly.
Back to google and it turns out that these days the prototype outfit is only called a “muslin”, and is generally made of much easier to work with cloth.
Away goes the muslin into a draw in case I ever take up cheese making, and I back on ebay to buy some cheap cotton curtain backing. This stuff is SO much easier to work with; stiffer and much more forgiving if you need to unpick your stitching without it falling to bits.
Here’s where I basically spent two months fighting with the tunic. Small victories came when I managed to sew my first princess seam. If learning to sew a princess seam is a test of your sewing skill, talking about your elation at nailing your first good seam is a test of just how comfortable with your masculinity you are.
For the whole two months I basically oscillated between thinking “it’s all going so well!” and “This will never be finished; the pins, pattern, fabric, sewing machine and ironing-board I’m working on are getting balled up and going in the bin” with the latter usually being towards the end of that sewing session and followed by a significant break. Fortunately with so much other stuff needing to be done for the costume, and being much better at electronics that sewing, I was able to leave it alone for long periods without falling behind.
Time caught up with me in the end, and with an 80% finished muslin shell and newly formed strong opinions on the ridiculously large amount of sleeve cap ease included in commercial patterns these days, I decided to get on and make the real thing.
In the end, I pretty much re-drafted every bit of the pattern onto some brown paper and I still ended up with bits of it weird and not matching up that needed resolving when I made the finished product.
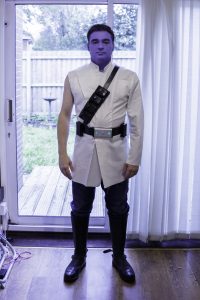
The Finished Product
I’m mostly pleased with how it came out. Considering it was a first go, and how incredibly complicated lined jackets are, there is very little I can complain about.
Sewing the lining in took around two days, then attaching the press studs by hand and in the right places took a further two or three days.
Adding the collar insignia and rank insignia to the tunic involved lots of magnets (I can’t say or think that word now without hearing Jack O’Neill) which worked well. The collar I found to be never straight using a single hook and eye, I’ll be finding a way to resolve that before I wear it again.
I wore the tunic for pretty much a whole day during Birmingham Comic Con, and it was really very comfortable with nothing underneath, the lining made it very nice to wear.
Future modification will include trying to sort out the collar and the “bunching” that seemed to happen through the day, but I rather suspect that’s just a side effect of wearing the belt over the top and carrying both a heavy gun and a heavy DSLR attached to it for the day.